Make Your Own Designs
by Lionel E. Deimel
A number of people have asked me how to create
curve-stitch designs using PostScript. I have invariably given
fragmentary instructions with little expectation that my correspondents
would actually have the patience to produce designs of their own with
this arcane tool. A recent request from a teacher, however, led me to
think that, given a bit more guidance, a few dedicated souls might give
my procedures a try. Rather than responding at length in a personalized
reply to everyone who contacts me, I thought it might be more efficient
to provide some instructions on my Web site once and for all. No doubt,
this, too, will generate questions, but it might also lead others to
produce some innovative designs.
Background. I first learned of curve-stitch designs in junior high
school. My earliest designs were done with pencil and paper. I
produced serious designs by trading my pencil for drafting pens and
India ink. All the designs shown on Lionel Deimel’s Farrago were
generated by computer using the PostScript Language, however. (PostScript is a
registered trademark of
Adobe Systems Incorporated.) PostScript is a so-called page
description language now widely used for desktop and commercial
publishing. It first achieved prominence as the language interpreted by
Apple’s LaserWriter printer in 1985. PostScript came along about 20
years after I had given up the tedium of drawing designs with pen and ink.
Although most of the PostScript code generated today is produced by computer
software to drive devices such as printers, PostScript is a full-blown
programming language that can be used by a human programmer. What makes
PostScript attractive for producing curve-stitch designs is its extensive
repertoire of operators for
vector
graphics.
The downside of programming in PostScript, at least for the typical
programmer, is that PostScript is a highly idiosyncratic language. Programming
experience is certainly an asset for the person wanting to learn how to use
PostScript, but it is less helpful than one might expect. PostScript makes
extensive use of stacks (FIFO queues), which results in code not likely to seem
very natural to most programmers. For example, one might write the following
PostScript code to set the variable y to the value 3 (x + y)
+ 1:
/y 1 3 x y add mul add def
One could just have easily written
/y x y add 3 mul 1 add def
or some other variant.
Tools. The standard introduction to PostScript has
long
been
PostScript Language Tutorial and Cookbook. Reading this book and following the exercises in it is a good way to
learn PostScript basics. (Order the physical book or use an
electronic version of it.) To get beyond the basics, consult the
PostScript Language Reference. Happily, it should not be necessary to read
all of this very large book. (Again,, order the physical book or use an
electronic version.)
PostScript is written in ordinary, printable
characters, so programs can be composed with an ordinary text editor, such as
Microsoft Notepad. (This discussion assumes the use of a Windows platform, but
the procedures I describe can be carried out in an analogous way on other
platforms.) Do not use a word processor, such as Microsoft Word, which saves
documents in a special format. A particularly good editor for PostScript
programming is
Notepad++, which understands PostScript, thereby making programming easier.
Being able to write a PostScript program is of
limited usefulness if you cannot display whatever it is the program is intended
to draw. A PostScript printer comes in handy here, although you can waste a lot
of paper while learning the language if a printer is your only available output
device. It is therefore helpful to have a viewer for PostScript files. For many
years, I used the free application
Ghostscript.
This software lacks a user-friendly interface, but another
piece of software, GSView, provided a more manageable front-end. The combination
allowed me to display PostScript output and generate images in common raster
formats such as JPG and PNG. Unfortunately, GSView is no longer available.
Various free viewers are available with which I have no experience.
Programs that allow the viewing of PDF files—the PDF format adds capabilities to
a PostScript base—can often display PostScript and encapsulated PostScript
files (see below). Adobe Acrobat can do this, but the free Acrobat Reader cannot.
Although I have used Adobe Acrobat in the past, I have
lately been using
Kofax Power PDF. This program can print a PostScript or
encapsulated PostScript file,
convert it to a PDF file, or generate images in several graphic formats. (Oddly,
saving a PNG file from a screenshot of a Power PDF window may yield a better
image than simply exporting a PNG file directly from Power PDF.) Like Acrobat, Power PDF
is not free.
Curve-stitch designs can be distributed as PDF
files, but if images are intended for documents or Web sites, raster graphic formats, such as PNG, JPG, or TIF
are more helpful. Images in these formats may be acceptable if not too large,
but they do not enlarge well. A happy alternative is the SVG (Scalable Vector
Graphics) file format. SVG files display sharp images that may be enlarged without
image degradation. The free program
Inkscape is a vector
graphics editor that can be coerced into displaying PostScript files and
exporting the images as SVG files.
Viewing PostScript files in Inkscape is simple, but
it requires some configuration of your computer to make this possible. I will
explain what you have to do, but I will leave details to the reader, as they will
differ from one computer to another. Do the following:
-
Download and install Ghostscript.
-
Add the locations of the bin and lib directories
of the Ghostscript installation to the Path system environment variable. (On
my computer, this required adding C:\Program Files\gs\gs10.00.0\bin
and C:\Program& Files\gs\gs10.00.0\lib to the Path variable.)
Although Inkscape displays PostScript files nicely
and produces fine SVG files, it cannot export common raster formats such as JPG
and PNG.
An Example. The image below is in a SVG
format. Enlarge it in your browser, and you will see that the lines continue to
be sharply defined.
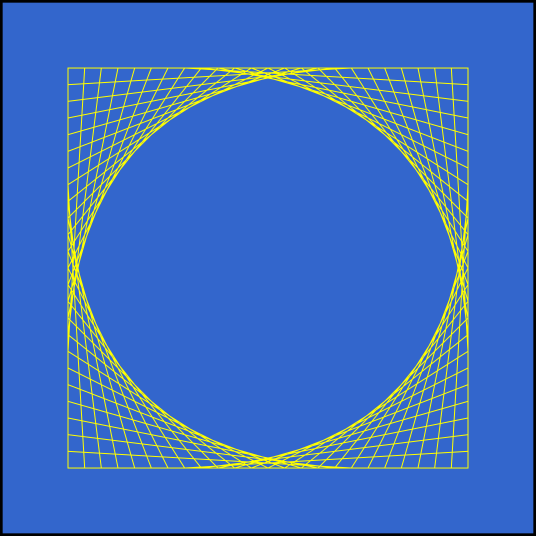
The PostScript code that Inkscape used to produced
the above image is the ollowing:
%! Adobe-PostScript

%%Copyright 2007 by Lionel Deimel. All rights reserved.

% Procedure square2

% This procedure creates a square with generalized curve-stitch
% parabolas drawn inside. The following variables are used:
%
% sidelength: length of side of square (all measurements in points)
% segments: # of equal-length segments into which each side of square is
%           to be divided
% seglength: length of each segment
% offset: distance around perimeter of square in counterclockwise
%         direction (measured in # of segments) betweeen points to be
%         connected in design
% xcoord: array of x-coordinates of (4 x segments) points on square
%         perimeter
% ycoord: array of y-coordinates of (4 x segments) points on square
%         perimeter
% index: loop index representing current point on square perimeter
%        being processed
%
% This procedure expects the following arguments on the stack when
% invoked(the top of stack is at the right):
%
% segments sidelength offset
%
% The procedure draws the design and strokes it.
%
% NOTES: When segments is a even number and offset is segments / 2,
% this procedure draws a square with four standard-construction,
% non-overlapping curve-stitch parabolas inscribed in the corners of
% the square. Other designs result from manipulating the values of
% segments and offset. The value of segments should be positive, but it
% need not be even. The value of offset should be non-negative. Values
% greater than 2 x segments repeat designs achievable with smaller
% offsets.

/square2 {

	% Save entered and computed parameters in dictionary
	/offset exch def
	/sidelength exch def
	/segments exch def
	/points segments 4 mul def
	/xcoord points array def
	/ycoord points array def
	/seglength sidelength segments div def

	% Save coordinates of segment endpoints in arrays xcoord and
	% ycoord. The points are numbered, beginning with 0 at the
	% origin and moving counterclockwise around the square.
	0 1 segments 1 sub {
		dup
		/index exch def
		seglength mul /dist exch def
		xcoord index dist put
		xcoord index segments add sidelength put
		xcoord index segments 2 mul add sidelength dist sub put
		xcoord index segments 3 mul add 0 put
		ycoord index 0 put
		ycoord index segments add dist put
		ycoord index segments 2 mul add sidelength put
		ycoord index segments 3 mul add sidelength dist sub put }
		for

	% Draw square
	0 0 moveto
	sidelength 0 lineto
	sidelength sidelength lineto
	0 sidelength lineto
	0 0 lineto
	closepath

	% Draw internal lines
	0 1 points 1 sub {
		/index exch def
		xcoord index get
		ycoord index get
		moveto
		xcoord index offset add points mod get
		ycoord index offset add points mod get
		lineto }
		for

	% Paint path
	stroke }
	def % square2


% Main program starts here

% Set color for background
0.2 0.4 .8 setrgbcolor

% Translate origin to allow for entire picture in upper right quadrant
1 1 translate

% Define dimensions of square and area around square.
% side: width of square
% matwidth: width of background around square
% picwidth: with of entire figure, ignoring framing border
/side 300 def
/matwidth 50 def
/picwidth side matwidth matwidth add add def

% Draw and fill square for curve-stitch design background
0 0 moveto
picwidth 0 lineto
picwidth picwidth lineto
0 picwidth lineto
0 0 lineto
closepath
fill

% Draw black border around just-completed square
0 0 0 setrgbcolor
2 setlinewidth
0 0 moveto
picwidth 0 lineto
picwidth picwidth lineto
0 picwidth lineto
0 0 lineto
closepath

% Paint path
stroke

% Set color and line width for design
1 1 0 setrgbcolor
0.75 setlinewidth

% Translate origin to lower left corner of design
matwidth matwidth translate

% Draw design
24 side 18 square2

% Display page
showpage

%%EOF | I wrote the program in Notepad++, previewed it in Inkscape,
and saved the image as an SVG file. The PostScript describes an image at the
bottom left of a PostScript logical page. By adding the line below at
the top of the PostScript file, I made the logical page the same size as the
figure: << /PageSize [402 402] >> setpagedevice
GSView can—well, could, anyway—also generate an
encapsulated PostScript (EPS) file, which is a
self-contained PostScript
file intended for incorporation into other documents. A PostScript file can be
converted to a usable EPS file by hand. The most important information that has
to be added at the top of the file is information about how big the resulting
image needs to be. The EPS file generated by GSView
from the program above, with a little editing, is the
following:
%!PS-Adobe-3.0 EPSF-3.0
%%BoundingBox: 0 0 402 402
%%Title: Curve-stitch design example for Lionel Deimel's Farrago
%%Creator: GSview from file web_example.ps
%%CreationDate: Thu Nov 08 13:30:09 2007
%%Copyright 2007 by Lionel Deimel. All rights reserved.
%%Pages: 1
%%EndComments
%%Page: 1 1
%%BeginDocument: Curve-stitch design example for Lionel Deimel's Farrago

% Procedure square2

% This procedure creates a square with generalized curve-stitch
% parabolas drawn inside. The following variables are used:
%
% sidelength: length of side of square (all measurements in points)
% segments: # of equal-length segments into which each side of square is
%           to be divided
% seglength: length of each segment
% offset: distance around perimeter of square in counterclockwise
%         direction (measured in # of segments) betweeen points to be
%         connected in design
% xcoord: array of x-coordinates of (4 x segments) points on square
%         perimeter
% ycoord: array of y-coordinates of (4 x segments) points on square
%         perimeter
% index: loop index representing current point on square perimeter
%        being processed
%
% This procedure expects the following arguments on the stack when
% invoked(the top of stack is at the right):
%
% segments sidelength offset
%
% The procedure draws the design and strokes it.
%
% NOTES: When segments is a even number and offset is segments / 2,
% this procedure draws a square with four standard-construction,
% non-overlapping curve-stitch parabolas inscribed in the corners of
% the square. Other designs result from manipulating the values of
% segments and offset. The value of segments should be positive, but it
% need not be even. The value of offset should be non-negative. Values
% greater than 2 x segments repeat designs achievable with smaller
% offsets.

/square2 {

	% Save entered and computed parameters in dictionary
	/offset exch def
	/sidelength exch def
	/segments exch def
	/points segments 4 mul def
	/xcoord points array def
	/ycoord points array def
	/seglength sidelength segments div def

	% Save coordinates of segment endpoints in arrays xcoord and
	% ycoord. The points are numbered, beginning with 0 at the
	% origin and moving counterclockwise around the square.
	0 1 segments 1 sub {
		dup
		/index exch def
		seglength mul /dist exch def
		xcoord index dist put
		xcoord index segments add sidelength put
		xcoord index segments 2 mul add sidelength dist sub put
		xcoord index segments 3 mul add 0 put
		ycoord index 0 put
		ycoord index segments add dist put
		ycoord index segments 2 mul add sidelength put
		ycoord index segments 3 mul add sidelength dist sub put }
		for

	% Draw square
	0 0 moveto
	sidelength 0 lineto
	sidelength sidelength lineto
	0 sidelength lineto
	0 0 lineto
	closepath

	% Draw internal lines
	0 1 points 1 sub {
		/index exch def
		xcoord index get
		ycoord index get
		moveto
		xcoord index offset add points mod get
		ycoord index offset add points mod get
		lineto }
		for

	% Paint path
	stroke }
	def % square2


% Main program starts here

% Set color for background
0.2 0.4 .8 setrgbcolor

% Translate origin to allow for entire picture in upper right quadrant
1 1 translate

% Define dimensions of square and area around square.
% side: width of square
% matwidth: width of background around square
% picwidth: with of entire figure, ignoring framing border
/side 300 def
/matwidth 50 def
/picwidth side matwidth matwidth add add def

% Draw and fill square for curve-stitch design background
0 0 moveto
picwidth 0 lineto
picwidth picwidth lineto
0 picwidth lineto
0 0 lineto
closepath
fill

% Draw black border around just-completed square
0 0 0 setrgbcolor
2 setlinewidth
0 0 moveto
picwidth 0 lineto
picwidth picwidth lineto
0 picwidth lineto
0 0 lineto
closepath

% Paint path
stroke

% Set color and line width for design
1 1 0 setrgbcolor
0.75 setlinewidth

% Translate origin to lower left corner of design
matwidth matwidth translate

% Draw design
24 side 18 square2

% Display page
showpage

%%EOF

%%EndDocument
%%Trailer | I hope that this discussion will discourage the fainthearted
and encourage the bold. I have no intention of established a Famous
PostScript Programmers’ School, but I will try to help any serious student
get unstuck if he or she tries to use PostScript and runs into the
proverbial brick wall. My e-mail address is below. Happy coding!
— LED, 11/8/2007, rev. 2/24/2023 |


